Wednesday 25 September 2013

Metro Style Apps

Metro Style applications are the full screen applications designed to incorporate user needs, are platform independent, enable touch interaction(s) with the users, supports multi-tasking, support different languages and locales and can be uploaded to Windows Application store for downloads.

As suggested by Microsoft, a Metro app can be built in various languages like by using HTML, CSS and JavaScript, or by using XAML with C# (New Metro API(s) are provided by Microsoft). But these are just the languages in which one can create the Metro Apps, Metro actually is new API(s) provided by Microsoft which is the subset of the .Net Framework API(s) (Very much Similar to what Microsoft has done for Silverlight or Windows Phone) with User Interface designing.

Microsoft has put a lot of thought work for choosing the API(s) for Metro Style Apps, which also provides the ability to easily migrate an application into Metro Application.

Here is the example for how to create a Metro Style App using HTML + CSS + JavaScript as Language

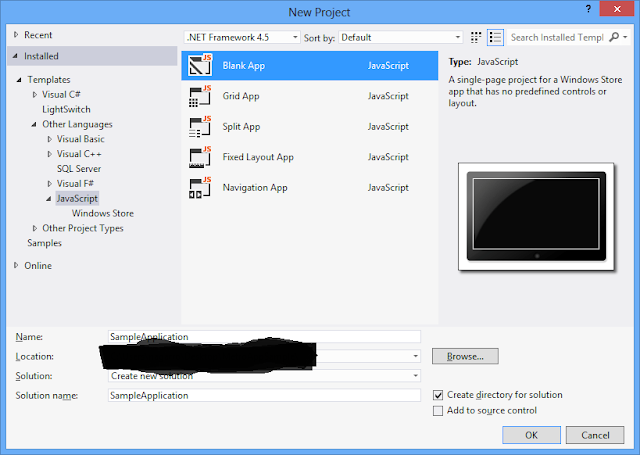
Open Visual Studio 2012; create a new Project by selecting JavaScript as Application or Project template type. In this for a simple app I have selected Blank App as the template shown in the screenshot below, one can select in according to the requirement.


As soon as you are done with it, you will be asked for the Windows 8 Developer Licence if you don’t have it already, so go ahead and download it.

Now you will see with the blank template, it automatically created few folder and files:

  • A manifest file which will contain the information regarding your application like Application name, title and information about all the pages which exist in your application.
  • Some log images, one of which is “storelogo.png”, this image is the one which becomes the logo for your application on Windows Store.
  • Some CSS and JavaScript files along with a default.html page.


On launching the application the default page will get opened in the full screen mode. So now you are ready to make any changes on your page and include the new pages.

On opening the default.js file you will see some code already written into it, although it is self-explanatory, let’s see what it does:

// For an introduction to the Blank template, see the following documentation:
// http://go.microsoft.com/fwlink/?LinkId=232509
(function () {
    "use strict";

    WinJS.Binding.optimizeBindingReferences = true;

    var app = WinJS.Application;
    var activation = Windows.ApplicationModel.Activation;

    app.onactivated = function (args) {
        if (args.detail.kind === activation.ActivationKind.launch) {
            if (args.detail.previousExecutionState !== activation.ApplicationExecutionState.terminated) {
                // TODO: This application has been newly launched. Initialize
                // your application here.
            } else {
                // TODO: This application has been reactivated from suspension.
                // Restore application state here.
            }
            args.setPromise(WinJS.UI.processAll());
        }
    };

    app.oncheckpoint = function (args) {
        // TODO: This application is about to be suspended. Save any state
        // that needs to persist across suspensions here. You might use the
        // WinJS.Application.sessionState object, which is automatically
        // saved and restored across suspension. If you need to complete an
        // asynchronous operation before your application is suspended, call
        // args.setPromise().
    };

    app.start();
})();

All the code is written in anonymous function which will fire automatically on running the app; “strict” keyword is used here, so as to do the error checking into the code written.

Now there are two variables declared:

var app = WinJS.Application;
var activation = Windows.ApplicationModel.Activation;

First one is “app” for storing the application i.e. Windows JS application object, next one is the “activation” which will contain the activation state of the application like if the application is a new launch or resumed from the state of suspension.

Next comes an event “onactivated”, this is the event which is fired every time on activation of the application whether it is launch or resume. And here you can see we can make check specific to the application state and do the coding as per the requirement.

Next is the “appcheckpoint”, which is fired whenever the application is going to be suspended, anything which is required to be done before suspension comes here.

Adding Simple Button and handle click event:

HTML:

<!DOCTYPE html>
<html>
<head>
    <meta charset="utf-8" />
    <title>SampleApplication</title>

    <!-- WinJS references -->
    <link href="//Microsoft.WinJS.1.0/css/ui-dark.css" rel="stylesheet" />
    <script src="//Microsoft.WinJS.1.0/js/base.js"></script>
    <script src="//Microsoft.WinJS.1.0/js/ui.js"></script>

    <!-- SampleApplication references -->
    <link href="/css/default.css" rel="stylesheet" />
    <script src="/js/default.js"></script>
</head>
<body>
    <div>
        Hi Abhishek Jain
       <br />
        <input type="button" id="btnTestJavascriptEvent" value="Click Here to Test Javascript Event" />
        <br />
        Message from Javascript:
        <label id="lblMessage"></label>
    </div>
</body>
</html>

JavaScript:

app.onactivated = function (args) {
        if (args.detail.kind === activation.ActivationKind.launch) {
            if (args.detail.previousExecutionState !== activation.ApplicationExecutionState.terminated) {
                // TODO: This application has been newly launched. Initialize
                // your application here.
            } else {
                // TODO: This application has been reactivated from suspension.
                // Restore application state here.
            }
            args.setPromise(WinJS.UI.processAll());
        }

        var testButton = document.getElementById('btnTestJavascriptEvent');
        testButton.addEventListener('click', TestButtonClick, false);
    };

    function TestButtonClick(e)
    {
        var messageLabel = document.getElementById('lblMessage');
        messageLabel.innerHTML = 'Message from Javascript Event...';
    }

Here I have created a method click handler for the button, and registered that handler to the button on application “onactivated” event. The “addEventListener” takes three arguments, first one is event type, second is the event handler and last is a Boolean value specifying if the event needs to be bubbled or not, “false” means allow event for bubbling.

Running App Screenshot:


May it provide a little help of how to create a simple HTML/JavaScript Metro App (For Downloading the Sample App, same I explained above, Refer: Sample Application); you can try much more at your end.
Tuesday 17 September 2013

Using Microsoft Roslyn

Microsoft Roslyn is an API which exposes C# compiler as a service or one can say now the whole compiler is exposed in a form of a library which can be included in your project or application, earlier you used to write code in c# and build that code, if it is successful you get the compiled code in the form of assembly, but now you can actually build or compile the code dynamically from within your .Net applications. You can now have Build process information or compile process information which was not available earlier. So now you can pass in your code as string to the API and it will provide you with the code in Intermediate Language (IL) with syntactic and semantic information regarding your code. So the major advantage we get is one can do the Code Analysis with the help of Roslyn.

Roslyn has nothing to do with the CLR, Roslyn can do same for you as any other compiler can do, that is it can compile your code and return it in Intermediate Language which can then be passed to CLR (As we know CLR don’t understand any particular language like C# or VB, so the role of every language compiler (.Net Compliant Language) is to produce a code in IL which is very well understood by the CLR)
With introduction of Roslyn (Right now Roslyn is available a Community Technology Preview) now the compilers are no more the blackbox (which earlier takes in the code writhen in managed language and outputs it as an assembly), now one can get the entire Syntax tree of the code in the form of object (API(s) are exposed to get the Syntax tree).

One of the major advantage which I see now is that you can produce code from User interface, it means that suppose your application is in Production environment and now you need to write some code, earlier you need to do the code changes and build the code again but now you can create a User Interface in your application (UI can have a textarea and a button) and you can actually write code on UI and get it compiled at runtime without doing the deployment again. But yes you have to make your application intelligent enough.
Roslyn API(s) are available as NuGet Packages; you can anytime, so one can install it very easily by Package manager.

Here is a sample code showing some of the features of Roslyn C# compiler.

First of all you need Roslyn Libraries which are available as NuGet Package which can be installed with the help of Package Manager in .Net Visual Studio. For Installing a Roslyn libraries, just open the Package manager console and type in the following command:

PM> Install-Package Roslyn.Compilers.Common

Once the installation is successful, create a sample console application or a Web Application as per your need and add the reference to the two libraries, which you have got from the above installation. Two libraries are:

Roslyn.Compilers
Roslyn.Compilers.CSharp

And you are ready to go.

Firstly we will see how to output the syntax tree or the code as the DLL. You can find the details of what the code do as inline comments within the code.

using System;
using System.IO;
using Roslyn.Compilers;
using Roslyn.Compilers.CSharp;

namespace SampleApplication
{
    class Program
    {
        static void Main(string[] args)
        {

            //Syntax tree is the code you want to compile at runtime
            var syntaxTree = SyntaxTree.ParseText(@"using System;
                class TestClass
                {
                    static void Main()
                    {
                        Console.WriteLine(""Testing Rolyn"");
                        Console.ReadLine();
                    }
                }");

            //Creates the copimlation, Here we are setting that compile it to a dll for the syntax tree defined above, adding references at runtime, here we are adding metadata
            //reference of System library at runtime
            var compilation = Compilation.Create("RoslynSampleApplication.dll",
                references: new[]
                {
                    new MetadataFileReference(typeof(object).Assembly.Location)
                },
                syntaxTrees: new[] { syntaxTree });

            //Here we are getting the Diagnostic results for a particular syntax tree on copilation, so if there are any errors we will get a list of that errors which can be
            //used to show it to user, These errors are just the same as we see in the Error list of Visual Studio.
            var diagnostics = compilation.GetDiagnostics();

            //Here i am prinitng the errors if any
            foreach (var diagnostic in diagnostics)
            {
                //You can also get the line number here on which the error has occurred. Code goes something like this: diagnostic.Location.GetLineSpan(usePreprocessorDirectives: true).StartLinePosition.Line
                Console.WriteLine("Error: {0}", diagnostic.Info.GetMessage());
            }

            //If we want to generate a DLL for the above syntax tree we can emit the compilation to a DLL by the following code.
            EmitResult result;
            using (var file = new FileStream("RoslynSampleApplication.dll", FileMode.Create))
            {
                result = compilation.Emit(file);
            }
        }
    }
}

The sample code I provided above does not have any errors, if you want to see some errors which are caught by the Compilation diagnostic, you can make some invalid changes in the Syntax tree and you can see the errors in the console window.

The DLL created above can now be consumed in the application. So this the way in which you can create DLL(s) at runtime, now let’s see how to write a piece of code at runtime, compile it and produce the output:

//Syntax tree is the code you want to compile at runtime
            var syntaxTree = SyntaxTree.ParseText(@"using System;
                class TestClass
                {
                    public static string GetWelcomeMessage()
                    {
                        return ""Welcome! Abhishek Jain"";
                    }
                }");

            //Creates the copimlation, Here we are setting that compile it to a dll for the syntax tree defined above, adding references at runtime, here we are adding metadata
            //reference of System library at runtime
            var compilation = Compilation.Create("RoslynSampleApplication.dll",
                options: new CompilationOptions(outputKind: OutputKind.DynamicallyLinkedLibrary),
                references: new[]
                {
                    new MetadataFileReference(typeof(object).Assembly.Location)
                },
                syntaxTrees: new[] { syntaxTree });

            //Here we are getting the Diagnostic results for a particular syntax tree on copilation, so if there are any errors we will get a list of that errors which can be
            //used to show it to user, These errors are just the same as we see in the Error list of Visual Studio.
            var diagnostics = compilation.GetDiagnostics();

            //Here i am printng the errors if any
            foreach (var diagnostic in diagnostics)
            {
                //var lineSpan = diagnostic.Location.GetLineSpan(usePreprocessorDirectives: true);
                //var startLine = lineSpan.StartLinePosition.Line;
                Console.WriteLine("Error: {0}", diagnostic.Info.GetMessage());
            }

            //Here the compiled code is emitted into memory stream which is used to create a assembly at runtime, and we are using this assembly at runtime only to invoke a
            //method present in one of the class of this assembly.
            Assembly assembly;
            using (var stream = new MemoryStream())
            {
                EmitResult emitResult = compilation.Emit(stream);
                assembly = Assembly.Load(stream.GetBuffer());
            }

            //Type of class is retrieved and for that type, method is retrieved from it using reflection, Method is invoked also by using reflection
            Type testClass = assembly.GetType("TestClass");
            MethodInfo methodInfo = testClass.GetMethod("GetWelcomeMessage");
            string welcomeMessage = methodInfo.Invoke(null, null).ToString();

            Console.WriteLine(welcomeMessage);
            Console.ReadLine();


So these are the very basic samples, I am also attaching the source code, if needed you can also try at your end. For downloading the sample application, follow: http://www.c-sharpcorner.com/UploadFile/25c78a/using-microsoft-roslyn/